How do I make a corflute shield?

Calico from spotlight is pretty cheap as well

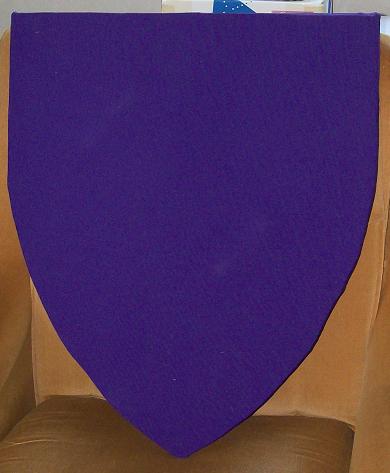
For anyone wanting to try a slightly different method, I made a small shield a few years back in a similar fashion, but with a different strap system. I oringinally used 6 layers of 'flute, each rotated 60 degrees for ultimate cross-grain support. Coreflute is fairly light, so weight wasn’t an issue. It was still complete overkill, and 4 layers rotated at 45 degrees is fine.

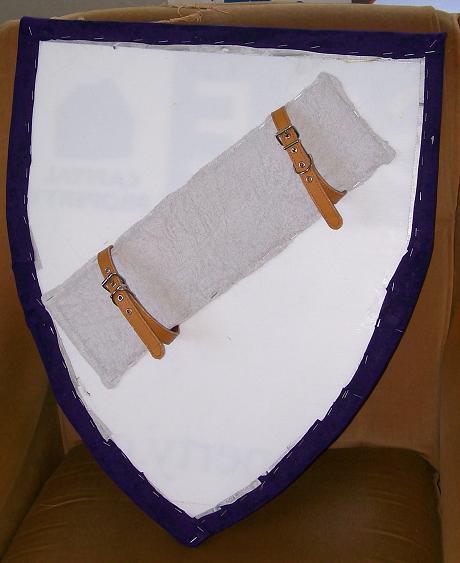
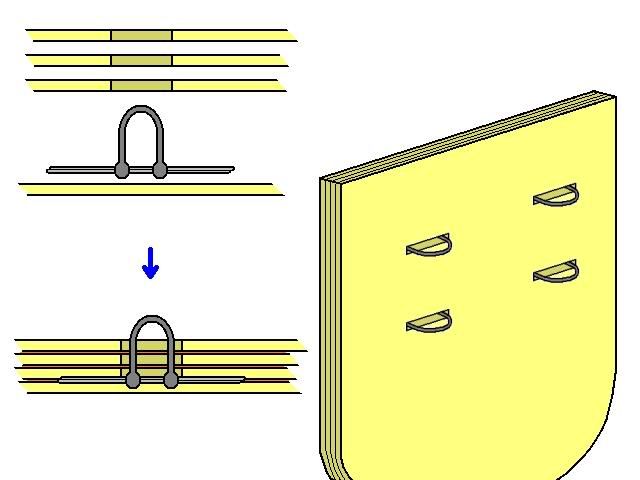
The big difference is in the strap - rather than putting the whole strap through the shield, I made some anchors using D-bolts and wire, bent into a figure-8 frame;

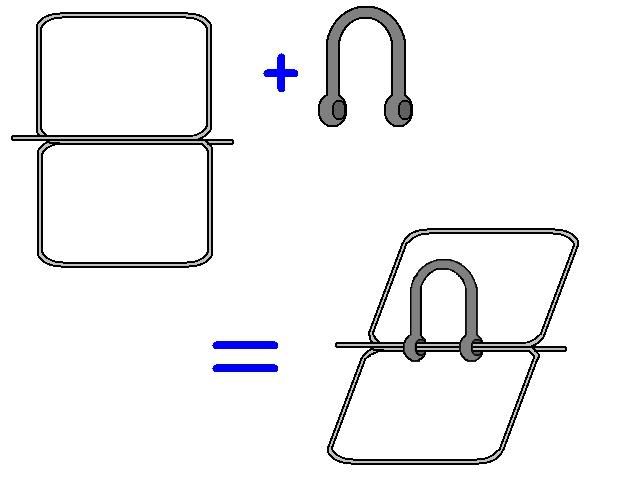
From memory I used fairly small D-bolts, about 30-40mm long. Then, as before you mark where you want your straps, cut rectangular holes through the first three layers of 'flute, and sandwich the whole lot. The net result should be a loop big enough to attach handles or straps to. As always, plenty of glue = win, and because the wire is fairly low profile there’s no need to cut any sort of recess for it or the D-bolt.

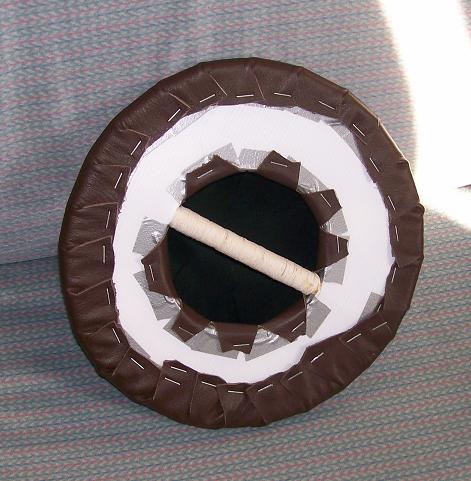
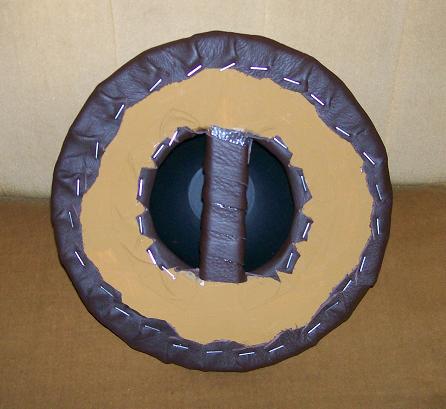
From there, it’s edging and a bit of padding where the arm will be as normal.

Now there’s two reason I like my shields built like this. Firstly, 4 layers of coreflute is awesome, wicked strong, yet still very light. Secondly, having mount-points for the handles and straps means they can be easily replaced, repaired, or even just removed as you need or want to try different handles/straps at your leisure. The first one I did actually had a strap made from dog-leash webbing with a pull-tight thing stolen from my bag, and the handle was a cloth-wrapped piece of garden hose with a short length of yellow nylon rope threaded through to tie on. It was awesome.
The only thing I see bad about doing it this way is that you can’t have a ‘fixed’ grip, built completely rigid to the shield itself, but then I don’t see that as a particularly huge loss.

Not painted - but covered in purple fabric:

And the back:

Still a bit of duct-tape showing, but a lot better. The next one will probably be tidier. It was stuck down with spray-ADOS on the front, then PVA on the sides and back, with a folded-over hem which was then staple-gunned.

Next step: getting a gold double-headed eagle on there. OHP-style projection and tracing seems to be my best bet for that.

I like it. Purple is my colour and it’s just missing a white chain, a gold chevron and three old grap leaves and I’ll take it :smiling_imp:

And finally:

Its not perfect - there are a few obvious mistakes. But it’ll pass the ten-foot test, which is what mattered.

The one I did for Sir Galahad (a cross of St George) looks better IMHO.

Heck Yes, you gave that bird two heads! :stuck_out_tongue:

I couldn’t decide which way it should be looking :slight_smile:

The eagle looks nice.

I think that avoiding staples might be an idea. I just have an intuition that someone could end up with a staple in them. I dunno how, but perhaps if one comes out, and then someone falls on it, or if one comes partially out and someone (probably the person wearing the shield) gets a little bit skewered on it. Could the fabric be glued to the plastic instead?

In terms of looks, I’d favour not having the back be white. The back of shields often seem to feature in photos. Could be painted.

I guess that both of these are examples of advantages of shields with foam glued to their front, back and sides (or constructed of foam sheets). There’s nothing on the surface but foam, and it can be painted all over.

Nice! I do like good heraldry.

“azure a double headed eagle argent”

Its glued down as well, but you need something else to attach it (and to keep the folded hem down).

A staple isn’t a tremendous risk (especially since its on the back of the shield), but I’ll keep an eye on them and see if we lose any.

Next time (and once I’ve got some suitable brown paint to do it with).

Amphigori has an OHP. Scan the design from the book, print it, photocopy it on to transparency, and trace it.

Its actually “purpure, a double headed eagle or”, but the camera flash has distorted the colour.

The second one. This one was obviously much easier to do.

Here comes the Medic! :stuck_out_tongue:

And the latest: a buckler, done as practice for a bigger Viking-style roundshield:

Its three layers of corflute, with a fibreglass rod sandwiched between then. The grip is foam and string. Its been edged in foam, with a boss using the pattern here. The cover is leather, held down with spray ADOS and staples. It could probably do with a flange round the base of the boss to hold it down, and if it fails its combat test, I’ll add one.

Looks good. Soft thin leather is a really good idea :slight_smile:

That’s looking really nice. Can I suggest covering the back in the same material and sewing it in place? Get some curved needles and some heavy thread from your local spotlight. They’re cheap and last for ages.

Buckler v2.0:

The grip is integral to the shield and wrapped. The boss is a 50 cent plastic bowl, with a rim of foam round it. It hasn’t been combat-tested yet, but if the all-foam boss held, then this should.

(The bad news is that I’m going to have to unpick all those lovely staples; in my rush to finish it to try it out, I forgot to edge it with foam. But there’s space to squeeze in a rim and restaple, I think).

The big lesson is that a wider grip requres a wider hole. Fortunately there’s room under the bowl for that. I also need to find an easy way of attaching it to a belt. Historic bucklers often have a metal tab or hook on the back for this, though they must have fallen off quite easily. Any suggestions?

They’re looking nice. 50c plastic bowls are a good solution :slight_smile:

Can I suggest glue instead of staples? And a second piece of fabric / leather on the back to make it look pretty(er)?

[quote=“IdiotSavant”]Buckler v2.0:

The grip is integral to the shield and wrapped. The boss is a 50 cent plastic bowl, with a rim of foam round it. It hasn’t been combat-tested yet, but if the all-foam boss held, then this should.

(The bad news is that I’m going to have to unpick all those lovely staples; in my rush to finish it to try it out, I forgot to edge it with foam. But there’s space to squeeze in a rim and restaple, I think).

The big lesson is that a wider grip requres a wider hole. Fortunately there’s room under the bowl for that. I also need to find an easy way of attaching it to a belt. Historic bucklers often have a metal tab or hook on the back for this, though they must have fallen off quite easily. Any suggestions?[/quote]

There’s a “basic kit” thread well back on this forum which suggests it.

Glue might not be as solid; I’d actually prefer something like carpet tacks or drawing pins for an authentic look, but they might not be safe (and would come loose).

I’ll look at fabric when I scale up, since it will be cheaper than paint, and less effort.

if your going to add “rivets” to secure the plastic boss may i suggest leather working rivets (if the thickness of the plastic allows. there will be no sharp points embedded in the corflute and it will be just as secure, gluing for extra hold would probably be wise in combination.

Just a thought :slight_smile:

I was thinking of “rivets” (or rather “nails”) for the leather cover; the boss itself doesn’t have anything to rivet to, since its a lipless bowl.

But one of the alternatives would be car red noses, which do have a lip on them, which could be glued and “riveted” to the front of the shield.